Sunday, September 01, 2013

Missing MenuCommand

I’ve spent the last few days trawling the net, and performing a heap of different experiments - trying to figure out why my custom MenuCommand wasn’t getting registered properly in my Visual Studio Shell application. Turns out it had nothing to do with incorrect GUIDs, or registry entries…

If you want to expose a custom command from your VS Package you need to use the ProvideMenuResourceAttribute. The C# VS Package wizard in VS2012 will correctly apply this attribute to the generated package if you tick the “Menu Command” option on one of the pages. This is what the wizard will put in .cs file that contains the generated package:

[ProvideMenuResource("Menus.ctmenu", 1)]

You may wonder what Menus.ctmenu refers to, but you won’t find it defined in any of the generated source or resource files… unless you look at the contents of the .csproj file generated for the package in a text editor, in which case you’ll find something like this:

<VSCTCompile Include="MyPackage.vsct"> 
    <SubType>Designer</SubType> 
    <ResourceName>Menus.ctmenu</ResourceName> 
</VSCTCompile> 

The ResourceName for your .vsct must match the first argument of the ProvideMenuResource attribute! If you use the wizard and tick the right option you’re all set, but if you decide to add some commands to an existing package you need to keep this in mind.

In my case the ResourceName element was missing from the .csproj file, and VS2012 doesn’t seem to provide any way to specify it via the UI so I had to add it in by hand.

Monday, July 15, 2013

Adding a Project Template to a VS Isolated Shell Application

I’ve recently spent way too much time trying to figure out why a VS Project Template I created by following the Creating a Basic Project System walkthrough wasn’t showing up on the New Project dialog of my VS Isolated Shell application. Turns out the build process wasn’t putting my template archive where the application was looking for it.

I created my application by using the Visual Studio Shell Isolated project template in VS2012, this generated four projects. Then I went ahead and added a new Visual Studio Package project (called DylanProject in this case) as per the walkthrough.

Solution Explorer

By default the ShellExtensionsVSIX project is configured to copy VSIX content to the location where the isolated shell application looks for extensions. So, I assumed that all I had to do after adding my project template to the new VSPackage was to update the source.extension.vsixmanifest in the ShellExtensionsVSIX project to include the new VSPackage.

ShellExtensionsVSIX Configuration

Unfortunately the extensions directory isn’t where the isolated shell application looks for templates, instead it looks in the locations specified in the .Application.pkgdef file in the application project (in my case DylanVSShell). Here’s the relevant excerpt from my DylanVSShell.Application.pkgdef:

// Create local VS template location
[$RootKey$\VSTemplate\Item]
"UserFolder"="$RootFolder$\ItemTemplates"
"CacheFolder"="$RootFolder$\ItemTemplatesCache"

[$RootKey$\VSTemplate\Project]
"UserFolder"="$RootFolder$\ProjectTemplates"
"CacheFolder"="$RootFolder$\ProjectTemplatesCache"

Where $RootFolder$ refers to the location where the isolated shell application executable resides. To ensure the templates end up in the correct location I’ve added a post build event to the VSPackage to copy the template archives, like so:

xcopy /I /Y /F $(TargetDir)ProjectTemplates\*.zip  $(SolutionDir)$(ConfigurationName)\ProjectTemplates

Might need to adjust those xcopy flags slightly to handle subdirectories in the ProjectTemplates directory if need be.

Friday, March 09, 2012

Blank Properties Page for C++ Files in VS2010

I’ve been using CMake 2.8.7 for the past few weeks to generate Visual Studio 2010 solution files for a C++ project of mine. Today I decided to add a precompiled header to one of my projects, unfortunately there is still no built-in support for precompiled headers in CMake , so I had to find some macros to do the job. After I got the macro in place I regenerated the solution file, and opened the file properties for the precompiled header I added in order to make sure CMake was setting up everything correctly…

VS2010 Blank Props Page


Unfortunately every property page in the C/C++ section was blank. At this point I erroneously assumed that the fault lay with CMake, specifically the setting of per-file COMPILE_FLAGS (since per-target COMPILE_FLAGS showed up on the project properties page as expected). After barking up the wrong tree for a while I stumbled on a message in the CMake list archives about property pages for source files disappearing as of CMake 2.8.5, turns out that my issue had nothing to do with precompiled headers after all, and was actually caused by a bug in VS2010. I’m happy to report the drive mapping workaround got my property pages back.

Sunday, September 14, 2008

return_by_smart_ptr policy for Boost Python

As part of my ongoing work to create some minimal Python bindings for Nebula3 I've implemented a new return value policy for Boost Python that's tailored for Nebula3 singletons. There were two existing potential candidates but neither quite fit the job. One was the manage_new_object policy, which will delete the C++ object embedded in a Python object when the Python object is destroyed, this leads to problems like this:
>>> from pynebula3.Core import CoreServer
# C++ singleton object is created and embedded in a new Python object
>>> coreServer = CoreServer.Create()
>>> print coreServer
<pynebula3.Core.CoreServer object at 0x00AB1340>
# existing C++ singleton object is embedded in a new Python object
>>> coreServer2 = CoreServer.Instance()
>>> print coreServer2
<pynebula3.Core.CoreServer object at 0x00AB1378>
>>> print coreServer2.AppName
Nebula3
# the C++ singleton object embedded in the Python object is destroyed
>>> coreServer = None
# remaining Python object now contains a dangling pointer to the C++ singleton object
>>> print coreServer2
<pynebula3.Core.CoreServer object at 0x00AB1378>
>>> print coreServer2.AppName # crash!

The other candidate was the reference_existing_object policy, and this is the one that is usually suggested for use with singletons. Under this policy the C++ object embedded in a Python object is not deleted when the Python object is destroyed, you have to delete the C++ object explicitly. The problem is that you should never delete a reference counted Nebula object explicitly, you should use AddRef()/Release() to adjust the reference count, and it will be automatically deleted when the count hits zero. So you'll have to do something like this:

>>> from pynebula3.Core import CoreServer
>>> coreServer = CoreServer.Create()
>>> coreServer.AddRef()
>>> print coreServer.AppName
Nebula3
>>> coreServer.Release()
>>> coreServer = None

Two lines to create an object and two lines to destroy it? No thanks! And so I set out to create my own policy. Essentially what I wanted is the behavior of the manage_new_object policy where the C++ object is deleted when the Python object is destroyed, but instead of embedding the C++ object itself I wanted it to embed a Nebula smart pointer to the C++ object. In fact manage_new_policy already embeds smart pointers instead of plain pointers, but they're not Nebula smart pointers. So all I had to do was take the manage_new_object policy and make it use Nebula smart pointers. Here is the new policy:

// return_by_smart_ptr.h

#include <boost/python/detail/prefix.hpp>
#include <boost/python/detail/indirect_traits.hpp>
#include <boost/mpl/if.hpp>
#include <boost/python/to_python_indirect.hpp>
#include <boost/type_traits/composite_traits.hpp>
#include "pynebula3/foundation/core/pointee.h"

namespace boost {
namespace python {
namespace detail {

// attempting to instantiate this type will result in a compiler error,
// if that happens it means you're trying to use return_by_smart_pointer
// on a function/method that doesn't return a pointer!
template <class R>
struct return_by_smart_ptr_requires_a_pointer_return_type
# if defined(__GNUC__) && __GNUC__ >= 3 || defined(__EDG__)
    {}
# endif
    ;

// this is where all the work is done, first the plain pointer is
// converted to a smart pointer, and then the smart pointer is embedded
// in a Python object
struct make_owning_smart_ptr_holder
{
    template <class T>
    static PyObject* execute(T* p)
    {
        typedef Ptr<T> smart_pointer;
        typedef objects::pointer_holder<smart_pointer, T> holder_t;

        smart_pointer ptr(const_cast<T*>(p));
        return objects::make_ptr_instance<T, holder_t>::execute(ptr);
    }
};

} // namespace detail

struct return_by_smart_ptr
{
    template <class T>
    struct apply
    {
        typedef typename mpl::if_c<
            boost::is_pointer<T>::value,
            to_python_indirect<T, detail::make_owning_smart_ptr_holder>,
            detail::return_by_smart_ptr_requires_a_pointer_return_type<T>
        >::type type;
    };
};

}} // namespace boost::python
Using the Core::CoreServer again as an example, I can bind it like this:
namespace bp = boost::python;

bp::class_<Core::CoreServer, Ptr<Core::CoreServer>, boost::noncopyable>("CoreServer", bp::no_init)
    .def("Create", &Core::CoreServer::Create, bp::return_value_policy<bp::return_by_smart_ptr>())
    .staticmethod("Create")
    .def("HasInstance", &Core::CoreServer::HasInstance)
    .staticmethod("HasInstance")
    .def("Instance", &Core::CoreServer::Instance, bp::return_value_policy<bp::return_by_smart_ptr>())
    .staticmethod("Instance")
    .add_property("AppName",
        bp::make_function(&Core::CoreServer::GetAppName, bp::return_value_policy<bp::return_by_value>()),
        bp::make_function(&Core::CoreServer::SetAppName)
    ))
    // etc.
    ;

And then use it in Python:

>>> from pynebula3.Core import CoreServer
# singleton instance is created and stored in a new Ptr<CoreServer> instance
# which is in turn embedded in a new Python object
>>> coreServer = CoreServer.Create()
>>> print coreServer
<pynebula3.Core.CoreServer object at 0x00AB1340>
# existing singleton instance is stored in a new Ptr<CoreServer> instance
# which is embedded in a new Python object
>>> coreServer2 = CoreServer.Instance()
>>> print coreServer2
<pynebula3.Core.CoreServer object at 0x00AB1378>
>>> print coreServer2.AppName
Nebula3
# the Ptr<CoreServer> instance embedded in the Python object is deleted,
# the singleton instance itself stays alive because another Ptr<CoreServer>
# instance still references it
>>> coreServer = None
>>> print coreServer2
<pynebula3.Core.CoreServer object at 0x00AB1378>
>>> print coreServer2.AppName
Nebula3
# the remaining Ptr<CoreServer> instance embedded in the Python object is deleted,
# since no other Ptr<CoreServer> instances reference the singleton instance it
# too is deleted
>>> coreServer2 = None

And that's all there is to it, though it remains to be seen how well it all works in practice.

Wednesday, September 10, 2008

Packages in Python extension modules

I've been working on some Python bindings for Nebula3 in the last few days, using Boost Python. At this point I don't intend to bind everything in Nebula3, I just need access to a few of the classes via Python (more on that in some future post). Boost Python is pretty nice, once you figure out the basics. The Boost build system (bjam) on the other hand is a royal pain to figure out if you want to use it to build your own projects, so I won't be using it for anything other than building the Boost libraries.

Anyway, in this post I'm going to explain how to create a package-like Python C/C++ extension module. I wanted all the Nebula3 Python bindings in one C++ extension module, with each Nebula3 namespace in it's own sub-module. Python packages are usually defined using a hierarchy of directories, so I want the equivalent of:

/mypackage
    __init__.py
    /Util
        __init__.py
        string.py
    /IO
        __init__.py
        uri.py

First of all you need to indicate to Python that your module is actually a package, you do so by by setting the __path__ attribute on the module to the name of the module.

// mypackage.cpp

BOOST_PYTHON_MODULE(mypackage)
{
    namespace bp = boost::python;

    // specify that this module is actually a package
    bp::object package = bp::scope();
    package.attr("__path__") = "mypackage";

     export_util();
     export_io();
}

Now we can create the Util sub-module.

// export_util.cpp

void export_util()
{
    namespace bp = boost::python;
    // map the Util namespace to a sub-module
    // make "from mypackage.Util import <whatever>" work
    bp::object utilModule(bp::handle<>(bp::borrowed(PyImport_AddModule("mypackage.Util"))));
    // make "from mypackage import Util" work
    bp::scope().attr("Util") = utilModule;
    // set the current scope to the new sub-module
    bp::scope util_scope = utilModule;
    // export stuff in the Util namespace
    bp::class_<Util::String>("String");
    // etc.
}

In line 8 we use PyImport_AddModule() to add the sub-module to Python's sys.modules list, and in line 10 we store the sub-module as an attribute of the package. And here's the IO sub-module.

// export_io.cpp

void export_io()
{
    namespace bp = boost::python;

    // map the IO namespace to a sub-module
    // make "from mypackage.IO import <whatever>" work
    bp::object ioModule(bp::handle<>(bp::borrowed(PyImport_AddModule("mypackage.IO"))));
    // make "from mypackage import IO" work
    bp::scope().attr("IO") = ioModule;
    // set the current scope to the new sub-module
    bp::scope io_scope = ioModule;
    // export stuff in the IO namespace
    class_<IO::URI>("URI",
        "A URI object can split a Uniform Resource Identifier string into "
        "its components or build a string from URI components.")
        .def(bp::init<const Util::String&>());
}

Once you've built the extension module you can import it into Python and check that it works just like a regular package.

>>> import mypackage
>>> from mypackage.Util import String
>>> from mypackage import Util
>>> from mypackage.IO import URI
>>> from mypackage import IO

This is something that doesn't seem to be well documented anywhere at this point, so hopefully this short writeup will save a few people some time. Note that while the code here uses Boost Python it should be relatively simple to adapt it to use the plain Python C API.

Saturday, August 09, 2008

Nebula3 IE Plugin

I've just committed the Nebula3 Internet Explorer plugin to the BrowserPlugin Nebula3 branch. The IE plugin is actually an ActiveX control, and could probably be embedded in other ActiveX containers with little (if any) changes. I've had to make no additional changes to the Nebula3 core aside from those I made earlier while working on the Gecko plugin.

I spent most of the time just trying to figure out how to create an ActiveX control, having never developed a COM control before it was rather daunting trying to figure out which interfaces the control needed. And there seems to be a lack of good online documentation for developing IE plugins, especially ones that aren't Browser Helper Objects (which serve a similar purpose to Firefox Extensions). So funnily enough, I ended up using the Mozilla Plugin Host ActiveX control code for reference.

Now I need something new to work on...

Wednesday, August 06, 2008

Nebula3 Gecko Plugin

About 3 weeks ago Bruce Mitchener mentioned it'd be nice if there was a web browser plugin that would allow a Nebula3 application to run within a web browser, kind of like Google's Lively. I thought it'd be cool too, though I couldn't think of any immediate practical applications myself. And so I set out to write a Gecko plugin to embed Nebula3 in Firefox 3 (and maybe other Gecko-based applications).

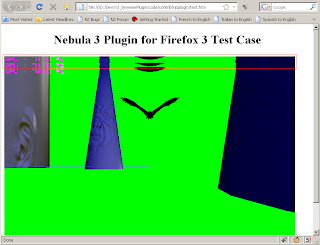
Today, I have a Gecko plugin that seems to do a pretty good job, with the exception of one scrolling related redrawing issue that I don't know how to fix. Google's Lively doesn't appear to suffer from the same problem so clearly I'm missing something. Here's how the issue can be reproduced:

  1. Shrink the browser window until the vertical scrollbar is displayed.
  2. Grab the scrollbar and move it up and down repeatedly.

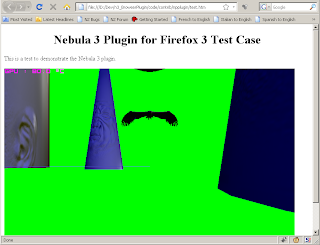
This is what it should always look like:

And this is after I get overly enthusiastic with the scrollbar:

Next up, an IE7 plugin for Nebula3... and I was doing such a good job avoiding installing IE7 up until now.